Introduction to Photography Principles
and Camera Terminology
Three Basic Adjustable Camera Parts
There are three adjustable parts of your camera that impact the kind of image that you capture. These are Film Speed (measured in ISO), Shutter Speed (measured in factions of a second), and Aperture (measured in f-stops).
In the film days we had all three, but the selection of a roll of film meant that we had that number constant over the entire roll of 24 or 36 exposures. Today’s digital cameras let you change the ISO speed from one image to the next, and this is now as important of a topic as the others.
ISO
The basic rule of thumb for ISO, and this holds true for traditional film as well as digital, is that the lower the ISO number the clearer the image. ISO is a function of how reactive the film media is to light. The less reactive it is, the clearer it will be. But, this comes with a trade off: due to being less reactive it requires a greater quantity of light to achieve the right exposure. As with many things in life, the ISO is a trade off of taking a picture very quickly versus having greater clarity. The goal here is to select the lowest ISO you can get away with, considering the other decisions you get to make.
Think of ISO like your ability to draw a picture. If you hurry, then your sketch will be a little off, but if you take your time and draw things carefully the picture will be much better.
Shutter Speed
The shutter speed is often directly related to your film speed. The shutter is the little thing that opens and closes quickly and acts like a light switch to let light into the camera. This is the thing you hear go "click" in your camera. All of the other camera settings you choose are basically set until you press the button, and then the shutter does its thing.
Shutter speeds can range from the lighting faster 1/4000th of a second all the way to the super long 30 seconds, and even beyond. Here the balance that you must strike is to capture the action's speed. If you’re photographing a fast moving race car or child, you may need to have a faster shutter speed so that the object doesn't blur. A speed of 1/60th of a second is typically fast enough for hand-held photography, but I often err on the side of caution and set my camera to not go below 1/80th of a second. If you’re shooting a landscape and you have a tripod, you can live with things like a half second since the trees and clouds aren't moving that fast (unless there's a lot of wind).
Aperture
The above ideas are the two most straightforward of all camera settings. The hardest one to understand is the Aperture or "f-stop." This is because its impact is hardest to see until after you take the picture. It makes no difference in composing your picture.
The aperture is the camera’s equivalent to your iris in that it opens and closes a circular hole to let more or less light to pass. This has the obvious impact that in bright-bright light you can throttle back the light with a smaller iris/aperture opening or in dim light you can open up the iris/aperture and let more light shine through.
But, doesn't the shutter already handle that for us since you can increase or decrease the speed of the shutter to compensate for the brightness?
I say, "Yes." You should let the shutter be the tool that handles the light quantity and you should use the aperture to handle another concept I will introduce in a moment. Just keep in mind that changing the aperture has the impact of changing the quantity of light and will therefore impact the shutter speed (or film ISO) to maintain a proper exposure.
Depth of Field
The real thing that you want to keep in mind for aperture
is what is called "depth of field." This is the phrase used
to talk about what is in focus in your picture and what is not
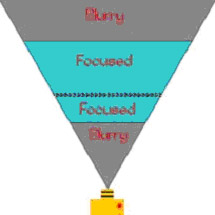 in focus. Focus here differs from motion blur (see
race car/shutter discussion above).
in focus. Focus here differs from motion blur (see
race car/shutter discussion above).
Think of two parallel planes. The one plane is the film in your camera and the other is the focus plane. As you change the focus on your camera you bring these two lines closer together or push them father apart. The depth of field is the part just in front of or just behind the focus plane that will also be rendered sharp and appear in focus.
All of these fundamental settings of your camera can be set manually (for the more experience photographers demanding the ultimate control) or in various combinations of manual settings and automatic compensation.
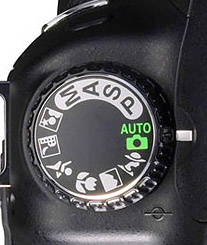
Advanced Camera Modes
Many cameras have M,A,S,P settings. These let you decide the level of control you want. In M you set everything. This is full Manual control. Typically your camera will have a little warning gauge to tell you if it thinks you’re over or under exposed, but you the photographer can ignore this feedback.
The A setting is for "Aperture." Here you set the f-stop you want and the camera will pick the shutter speed. Depending on if you set the ISO manually or left this up to the camera, this is another setting that the camera may set for you. Typically, this is the mode I shoot in. I can select my f-stop and point the camera however I desire to compose my picture and the camera does the rest of the thinking for me. It is possible to set such an extremely small aperture (large f-stop) in a low-light situation that you camera cannot gather enough light even with a long shutter opening to get a proper exposure. Super long shutter times often introduce their own noise in photos and great care must be taken to consider moving objects. Things like the sun and the stars do move, although not fast enough for our eye to notice, our cameras can capture this movement over a few seconds of exposure.
S is for "shutter." You get to dial in from ultra fast clicks to super slow clicks and the camera will shift the aperture (and ISO, maybe) to compensate for your requested shutter speed. Since there may not be a possible aperture and ISO setting to compensate for extreme (fast or slow) shutter speeds you can go beyond that the camera's abilities here and force an improperly exposed image.
Of the four mentioned here, P is perhaps the simplest. This typically stands for "Program Auto" and is actually quite similar to the A setting except it will try to keep you from going into the deep end of the extremely long shutter times.
If you were to point your camera at a particular subject, and for a given ISO, there might be several proper exposures. Consider, for example, 1/200th of a second at f/4 to be a proper exposure. Well, if we change the aperture to the next "full stop" of f/5.6 we have just cut the light in half, so we double our shutter speed to 1/100th of a second to strike a balance. This will result in the same quantity of light striking the film (or digital sensor) and have the same proper exposure. But, we have changed our depth of field: in this case we have increased our depth of field. We also may have introduced opportunity for our subject to blur, but at these example shutter speeds, even 1/100th is still relatively fast enough for most situations.
This idea of having the same proper exposure but two different f-stops and shutter speeds is called bracketing, and the P setting lets you shift up and down the scale of proper exposures. Think of this like sliding in out of the depth of possible depths of field (shrinking or growing the depth of field). Or think of it like sliding up and down the speed of the shutter. The P will just keep you on the proper-exposure chart and won't let you fall off both ends and get an over or under exposed photograph.
Here’s a Tip: Set your camera to a middle-of-the-road ISO to start with. For example, your camera may do ISO 100, 200, 400, 800, and up, but at ISO 800 and above you start to notice some grain or noise and the images are less desirable. Clearly ISO 100 would be optimal, but you can’t drop any lower than that if you need to later, so start out at ISO 200 or 400 (if possible, maybe you camera can do ISO 320). This is still well within your acceptable image quality range, but gives you some flexibility to slide up and down a little if you need to compensate for things. Then, keeping in mind the minimum shutter speed you can do (for example, no slower than 1/60th of a second for hand-held photos) set the maximum aperture that your lighting permits. This will yield a well-exposed and ISO-acceptable image with maximum depth of field.
Here is an example chart of equally "proper" exposures for a given quantity of light that you may encounter. You can imagine the motion blur you would get from a Ľ second exposure and the super tight depth of field from the f/1.4 exposure.
| Shutter Speed: | 1/4 second | 1/8 | 1/15 | 1/30 | 1/60 | 1/125 | 1/250 | 1/500 | 1/1000 | 1/2000 | 1/4000 |
| f-stop: | f/45 | f/32 | f/22 | f/16 | f/11 | f/8 | f/5.6 | f/4 | f/2.8 | f/2 | f/1.4 |
I should point out that the above chart is practically impossible as I am not aware of any lens which is capable of such a wide (f/1.4) and such a tiny (f/45) aperture. Typically a lens’ range covers only a fraction of the above scale: maybe the right 6 stops, or the middle 7 or the left 8, but not all of the ones listed in this example.
Simple Camera Modes
Your camera probably has other pre-set scene modes. These are just pre-set to have a bias towards a part of the list of acceptable exposures. The Action Mode or Sports Mode (often a little icon of a person running) has a bias towards the fastest shutter speed possible to capture the moment quickly.
Quiz: If the action mode were used, what type of bias for aperture would you expect?
The most basic option that is the opposite of Action Mode is Landscape Mode (typically the icon is a framed picture with a mountain). Here the goal is to have a longer exposure with greater depth of field. Also, this mode will disable your camera’s flash since it is assuming you are taking a picture of a vast expanse that your flash will never be able to illuminate. Other than the flash restriction, this mode is similar to the mode described in the earlier Tip.
If your camera has just a general "Auto" mode then this is sort of the middle setting of the available ones that your camera can use. It just shoots for the middle of the bracketing opportunities and hopes that is what you like. As you may be trying to highlight something artistically and not just get an average picture, this setting may not be your best choice. As you get more experienced you’ll find this will be your least used setting.
In many circles this mode is referred to as "PHD." Not for being super smart, but it stands for "Push Here, Dummy" and is a great mode to hand your camera to someone (a waiter perhaps) to take a picture of you.
The other scene modes such as Portrait or Macro are just variations of the above themes. Portrait (the icon is often a picture of someone’s head) works best when photographing a single subject and it will typically set your camera’s color saturation to work best with skin tones (as compared to grass, for example). Macro mode (flower icon) is similar to Portrait but it assumes you’re going to be focusing close-up and it optimizes the colors for very vibrant flowers and grasses. Both modes use a large aperture (small f-stop) and thus a faster shutter speed.
The Sunny 16 Rule
Another tip handed down by generations of photographers is called the Sunny 16 Rule. The idea here is that on a generally sunny day to get a proper exposure you should set your aperture to f/16 and set your shutter speed to roughly the reciprocal of your film speed. For example, if shooting with ISO 200 film (or equivalent digital capture equivalent) then set your shutter to 1/200th of a second.
This is a great rule-of-thumb to start from. One of the advantages of digital photography is that you get instant feedback so you can make adjustments in the field, not back in the darkroom. As you gain experience you can begin to see light for both its quantity and quality and you can make decisions about how you want to record that light before you even bring your camera up to your eye to compose a picture.
Composing Your Shot
Other than selecting a depth of field that is most flattering to your subject, how you compose your shot, or how you arrange the elements that are captured in the photograph, is the most important part of photography.
Just like a composer arranges a musical piece to have certain instruments playing together or opposing each other you as the photographer have to arrange the elements in your photo. These elements may be people, pets, props, or something you can never move like a building.
One rule that is often practiced is what is called the rule of thirds. The following photo has had lines added dividing it, in both the horizontal and the vertical direction, into thirds.
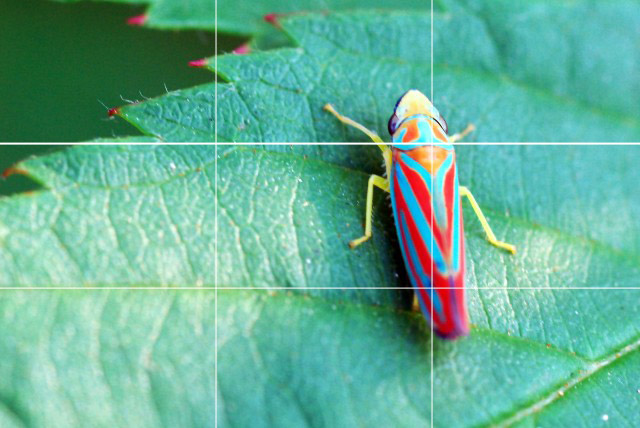
The idea behind this "rule" is that if you create interest for the viewer's eye to move around in the image it will be more interesting and therefore a better photograph. There are all sorts of rules about balance of the strong and the weak, the use of negative space, and if you're really interested in the psychology of this "rule" then I encourage you to read more sources on the subject.
What I can suggest, however, is that you take to heart this corollary to the rule: center is deadly.
What that means is that if you put something in the dead center of your image, it's deadly boring.
Some further notes about Aperture
So as to not confuse you too much at this point I recommend skipping this part off of your copy and just looking at when you’re reached a new level in your photography and want to learn some more.
F-stop is the focal length divided by the diameter of the lens. For example, a 200mm f/4 lens will be 50mm wide. Get out your ruler and measure it. 200mm/50mm = f/4. That is why f-stop is typically written as f/4, meaning "focal-length over 4" or "focal-length divided by four."
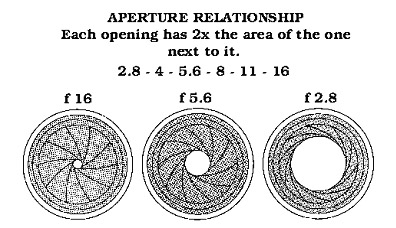
Lenses are marked with a series of f-stops, each one lets in half as much light as the previous one. The light-gathering ability of a lens is determined by its area, and f-stops are determined by diameter. Area is related to diameter squared. The progression of f-stops,
| 1 | 1.4 | 2 | 2.8 | 4 | 5.6 | 8 | 11 | 16 | 22 | 32 | 45 | 64 | 90 | 128 | etc |
Moving two or three stops produces two or three doublings or halvings, so two or three stops is a change of 4x or 8x (2x2 or 2x2x2). Thus, f/1.8 is three and one-third stops faster than f/5.6. To put that another way, it lets in ten times the light. And, an f/1.4 lens lets in 16 times the light as an f/5.6 lens. This is why fast lenses are so sought after by professionals, advanced armatures, and anyone who just wants to take good photographs when super-bright daylight is not available, and why camera companies have to do something about the slower lenses letting in such small amounts of light, so they offer Vibration Reduction or Image Stabilization.
But not everything is great at the extremes. A very wide-open aperture will often have issues such as light fall-off (darker corners than the center of the image, also called vignetting) and flaws in the lens design (called aberrations) will start to appear more easily. These aberrations appear as almost like a slight ghost image or other clouding of the subject. At the other end of the spectrum, with very tiny apertures, light tends to bend more and we create diffraction of the image. A simple example of diffraction is how our eyes see colors in a spider’s web when really the web is acting like a sort of prism and bending the white light and separating its colors. In our pictures diffraction shows up as a colored ghosting of our subject.
Because of the issues of extreme apertures a general rule is to use f/4 or f/5.6 to get the optimal image quality out of your lens and camera setup. But, you should play around and get to know your own lenses (or camera, if you cannot change lenses) to better understand how your setup can handle the extreme apertures and ISO settings.
I typically use the A setting on my camera as I dial in f/4 or f/5.6 for general use and go to the extremes as the need arises. I keep an eye on the shutter speed and if necessary I make changes to the ISO settings to balance out a fast-enough shutter speed for the subject or lighting conditions. I try to take pictures thinking first about composition (what to include in the photo, what angle to shoot it at) and then I think about depth of field. Do I want a blurry background? How much of the subject needs to be in focus before it is distracting? I then have my equipment take the picture I want.